BlenderPerspective
Outdated
Currently under revision
Introduction
The purpose of this page is to collaborate on making a single camera and lighting setup to use with Blender for generating 2D images of buildings and bobs with common perspective and shading.
More documentation is available on the Graphics Development page.
Selecting an issue to work on
Media bugs and projects are tracked in the Widelands repository, and they all carry the media label.
Media repository
Our models and animations for widelands can be found in our media repository, which has a separate project on Codeberg, at
https://codeberg.org/wl/widelands-media
See Gitprimer to learn how to download and collaborate.
You can use these files as an example, and/or style guide.
Also, for rendering all directions and creating the playercolor masks we have a python script (currently for Blender 2.7), for consistency's sake we recommend using our templates which can be found at "graphics\stock_sources\blender_set_templates\empty_building_template.blend" and "empty_worker_template.blend". If you want to work them into a model created previously, the scripts from "graphics\tools": "innerBuilding.py" or "innerWorker.py" are the files to actually include.
nb: currently, some of the .blend file might contain an error in the script. If you see the script is bugging simply replace it (copy/paste) with "innerBuilding.py" or "innerWorker.py".
HOWTO make a graphic with blender
Working these scripts
For these scripts to work, there are two things you need in the model:
- All lighting and the camera should be a child of an object named "MainLightControl", so the script can rotate them around (this should already be taken care of if you use one of the templates).
- The parts of your model you want to be player colored in the game should either be in a mesh group "PlayerColor", or have a material named "PlayerColor" (Take care to only have one material of this name and use it in all the necessary places).
After this open up a text display in blender with the relevant "inner" script, move the mouse over it, and press Alt-P. The rendering menu should appear:
- the upper part of it is for rendering a series of pngs to be used in the game (take care to save your model before rendering with the PlayerColors option, as that changes your mesh).
- the lower part is for testing purposes, moving the camera to the cardinal directions that will be used at rendering.
Modeling
Start with the above file or any attached blender file you find on the page. But make sure that the lighting (dropped shadow) matches approximately with Widelands. You can also import pre-made models into the base.blend file. Simply go to File->Append, browse to your file, append the scene you want. Switch to this new scene, select all the objects you want, press ctrl-L and select To Scene. Then remove the imported scene and you have your new objects in the first scene.
Design your object around the center (0,0,0), after this, select camera, camera-target and move them along the z axis till your object is in the center of the camera. Render a big picture without shadow (disable the ground plate on layer 11), AO enabled and high sampling rate, and on KEY render type (not SKY). Make this pic around 640x480 pixels big and save it. If your object drops a shadow, enable (shadow only) on all your materials and turn off AO, render again with your ground plate enabled. Save this pic as "shadow" or something. It only contains your background color and black spots, where shadow is.
When you resize, make sure you always turn interpolation off! In the Gimp (or any other Photoshop like tool), resize your picture to 24x24 for menu pictures (if it is a ware, you can get the queue_empty picture by overlaying a black layer with darken_only enabled). For the on-map pictures, resize to appropriate size, also resize the shadow pic, then copy the pic over the shadowpic - eh voila, you're done. Do this for every frame of your animations.
This is just my idea, but I say using " MIR dot net "(multiple image resizer) would seriously speed things up with animations.
Getting the animations into Widelands
This section explains a workflow that you can use to export your Blender files to *.png files for use in the game. We will use the Empire's Armorsmith as an example.
Exporting
For this section, you will be working in the widelands-media repository.
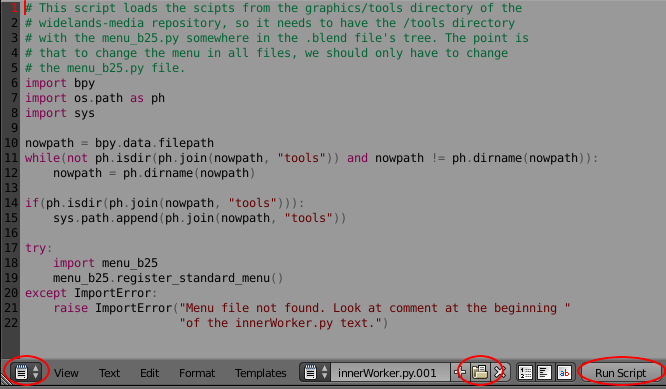
First, we'll need to load one of our export scripts into Blender.
- Open a Text editor in a Blender area
- Open /graphics/tools/innerWorker.py for walk/walkload animations, or /graphics/tools/innerBuilding.py for an animation facing in only 1 direction
- Click on "Run Script"

Now we are ready to configure our export.
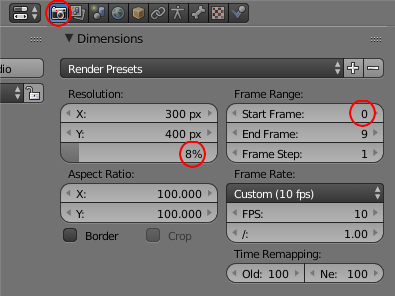
- Open a Properties editor in a Blender area
- Set the Resolution percentage to control the size
- Frame Range needs to start at
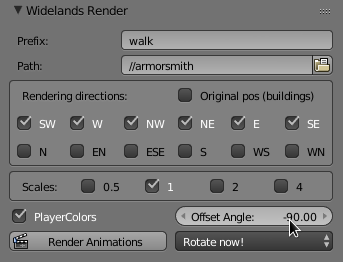
0so that your filenames will start with00. Otherwise, the Widelands engine will not find your files. - Scroll to the right to the "Widelands Render" section that has been created by our script, and choose your settings (see table below).
- Click on "Render Animations"
- Document your settings in a file like this one
bzr commitand push your changes


| Setting | Explanation |
|---|---|
| Prefix | The name of the animation, e.g. walk or walkload |
| Path | Anything you like - this is where the exported *.png files will be placed |
| Rendering directions | For animations facing only 1 direction, "Original pos (building)" is what you need. For walk/walkload animations, tick everything in the first row. |
| Scales | Only 1 is mandatory for the Widelands engine. So, you don't need to export all scales until you're ready for your final export. |
| PlayerColors | When this is on, the render will also create files for the player colors. Note: Make sure to save your file before rendering with this option switched on |
| Offset Angle | You can use this to adjust the rotation of the Blender exports to ensure that walk_e will actually face East etc. |
The resulting files look like this:
walk_e_0.5_00_pc.png
walk_e_0.5_00.png
walk_e_0.5_01_pc.png
walk_e_0.5_01.png
...
walk_e_1_00_pc.png
walk_e_1_00.png
walk_e_1_01_pc.png
walk_e_1_01.png
...
walk_e_2_00_pc.png
walk_e_2_00.png
walk_e_2_01_pc.png
walk_e_2_01.png
...
walk_e_4_00_pc.png
walk_e_4_00.png
walk_e_4_01_pc.png
walk_e_4_01.png
...
walk_ne_0.5_00_pc.png
walk_ne_0.5_00.png
walk_ne_0.5_01_pc.png
walk_ne_0.5_01.png
...
Adding the animations to Widelands
From this section onwards, you will be working in the widelands repository. We'll stay with the armorsmith as an example.
- Copy your exported files into the unit's directory, e.g. data/tribes/workers/empire/armorsmith
- Define your animation in the
init.luafile as explained in our scripting reference on animations - Test your animation in the game or editor to ensure that the size looks good and the hotspot fits. For the hotspot, bigger numbers will shift the animation up and to the left.
Creating a spritesheet
In order to save disk space, we work with spritesheets. We have a tool for that called wl_create_spritesheet which you have to run in a terminal. Running the tool will also crop the animation, so it's worth running even if you animation has only 1 frame.
- Create a
tempdirectory - Run
./wl_create_spritesheet empire_armorsmith walk tempto create the spritesheet for our armorsmith example - Delete the old animation files
- Copy the new files to
data/tribes/workers/empire/armorsmith - The tool will have printed some Lua code into the terminal, which includes an adjusted hotspot for the cropped animation. If the animation has multiple frames, paste it into a
spritesheetstable. If it has 1 frame, paste it into ananimationstable. Note: Any sound effects will be missing from the generated code, so make sure to add them back in after pasting the code into theinit.luafile.
This is what the generated Lua code looks like:
walk = {
   directory = dirname,
   fps = 10,
   frames = 10,
   rows = 4,
   columns = 3,
   directional = true,
   hotspot = { 6, 23 }
}
And the generated files look like this:
walk_e_0.5_pc.png
walk_e_0.5.png
walk_e_1_pc.png
walk_e_1.png
walk_e_2_pc.png
walk_e_2.png
walk_e_4_pc.png
walk_e_4.png
walk_ne_0.5_pc.png
walk_ne_0.5.png
walk_ne_1_pc.png
walk_ne_1.png
...
Finishing up
In order to save even more memory, we use some external tools for optimizing the *.png files.
On Ubuntu, you can install them via sudo apt install advancecomp optipng pngcrush.
Install the tools that you can find, then run:
utils/optimize_pngs.py -d data/tribes/workers/empire/armorsmith/
Now you're ready to add the new files and your changes to init.lua to the repository:
git add data/tribes/workers/empire/armorsmith/
git commit -m "Spritesheets for Empire Armorsmith"
git push
Note: DO NOT use git commit -am, this will not add the new files to git!


